When you start using a new mobile phone, you will need to remove the old phone from your SVI MFA authentication methods.
Follow the steps below to do so:
...
Go to aka.ms/mfasetup in your web browser on your computer and sign in. If you do not have your old phone to hand and are prompted to authenticate at the sign in page, you will need to use your back up option - click “I cannot use my authenticator app right now.” Choose the back up option which most users have set to their phone number and a phone call will be received. Once signed in, in the Security info tab you should see a page similar to the screenshot below
...
The Authenticator app on your mobile phone functions as a key to your account. When you link your SVI Microsoft account to the Authenticator app then this key is stored in the app on your phone. Uninstalling the app, getting a new phone, or a factory reset (wipe) of your phone will remove the key.
When this happens, you will not be able to use the Authenticator app on your mobile to verify your identity, as the key doesn’t exist. You will need to link your new app or phone to your account in order to generate a new key to be able to verify your identity again.
This process is 4 steps:
Getting back into your account
Deleting your old phone/app as a sign-in method
Setting up your new phone/app
(Optional) Enabling passwordless phone sign-in
...
Step 1 - Logging back into your account
When you first set up the Authenticator app, you would have added your mobile phone number as a backup MFA method. You can use this to verify your identity so that you can log back in
In a web browser, go to aka.ms/mfasetup
Enter your SVI email address
Enter your password
You will then be prompted to approve the sign in request on your Authenticator app (which you don’t have any more)
Click the blue text near the bottom: “I can’t use my Microsoft Authenticator app right now”
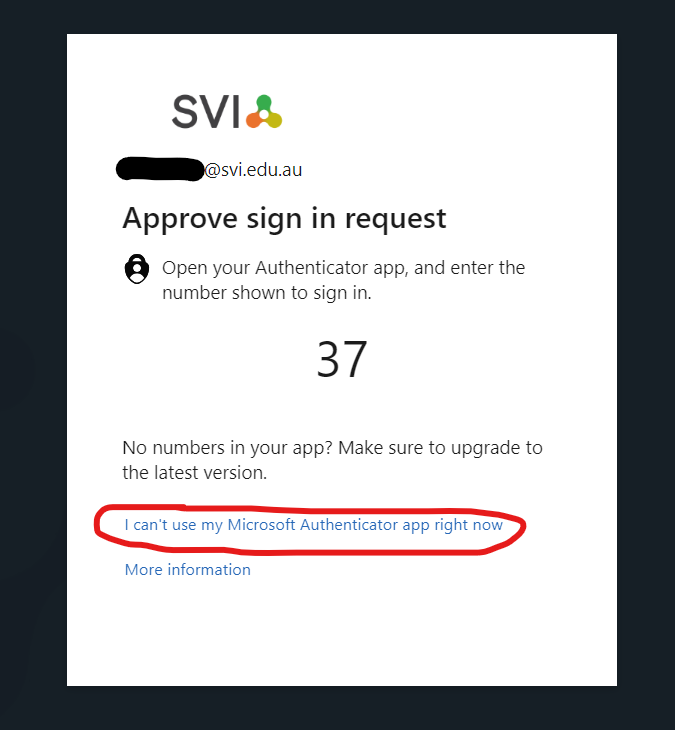
You will then be able to choose one of your backup MFA methods:

Select the option to call your backup phone number
Answer the call and follow the prompts to verify the sign-in
...
Step 2 - Deleting your old phone/app as a sign-in method
When you have signed in, you should see the Security info page:
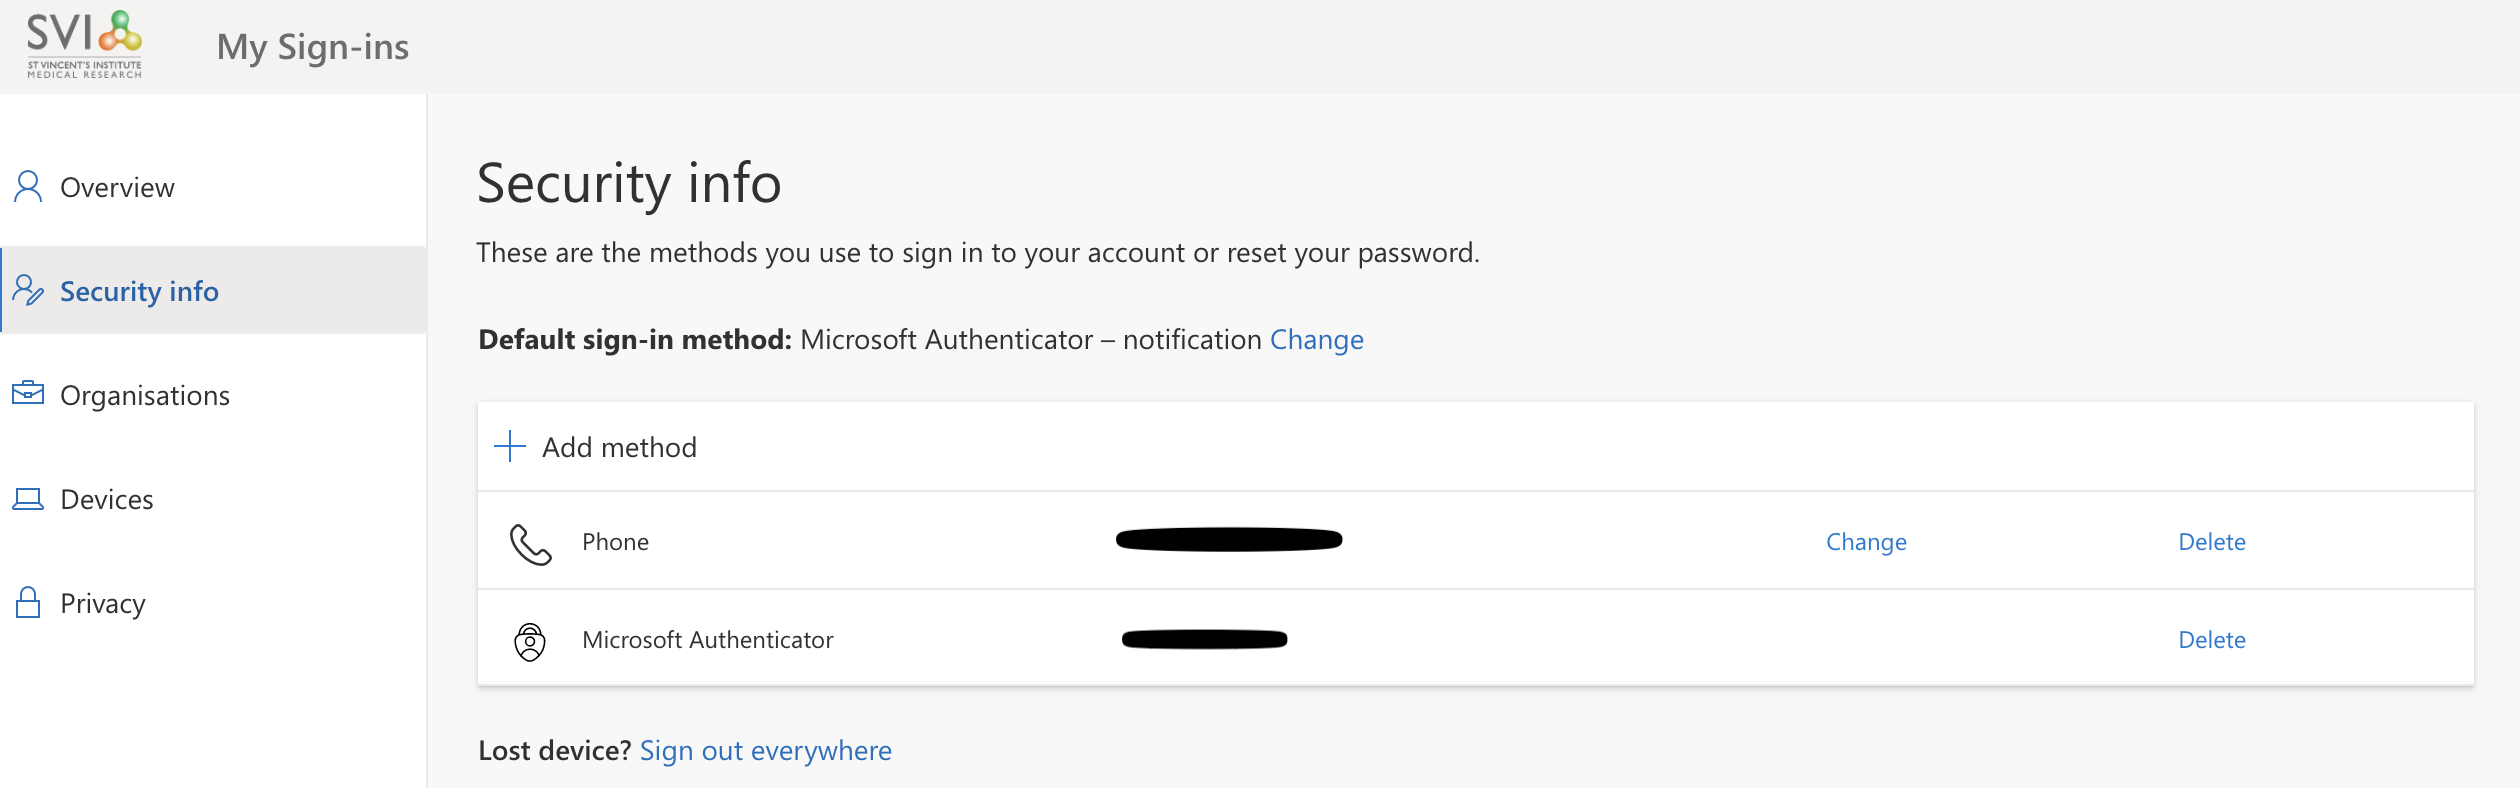
Click the Delete option next to the Microsoft Authenticator and you will be prompted to confirm - click OK.
...
You should be left with 1 method remaining in your list, your phone number. Now click the + Add Method button
...
...
Step 3 - Setting up your new phone/app
| Info |
|---|
These instructions assume you are using a web browser on a desktop computer |
Click the + Add sign-in method button

In the popup window that appears, select Authenticator App and then click Add
...
Keep this page open still on your computer. If you haven’t already, on your new phone download the Microsoft Authenticator app from your relevant app store and click the Add Account option then select “work or school account”.
...
Click the next button on your computer and on your phone select the Scan QR code option and scan the QR which you will see on your computer screen.
...
...
The page above should change after you scan the code. Enter any PIN or fingerprints as needed on your phone (this will depend on the phone and how you have set it up).
...
You will be prompted with a test approval on your phone so approve that and follow the next prompts you will see on screen.
...
Download the Microsoft Authenticator app on your new phone (if you haven’t already). You can click the blue text Download now to display QR codes to the app for Android and iOS.

On your computer:
Click Next
Click Next
A QR code will be displayed
Leave it open and continue the instructions below:
On your phone:
Open the Authenticator app and approve any license agreements and conditions (if they appear)
Allow the Authenticator app to send notifications (Important step)
Click the + icon at the top of the Authenticator app phone screen
Select “Work or school account”
Select “Scan a QR code”
Allow the app to use the camera (if prompted)
Scan the QR code with the Authenticator app
This should show a brief loading page and then you should see an entry in the Authenticator app for St Vincent’s Institute with your email address below it
⚠️ If you get an error here that the QR code has already been used, on the screen with the QR code click the Back button and then Next again. This will generate a new QR code
On your computer:
Click Next
This will show a 2 digit number on the screen. Enter this number on your phone when prompted and approve the sign in
Verify that your Default sign-in method is set to App based authentication - notification and change it if necessary

...
Step 4 - Enable passwordless phone sign-in (optional)
The standard login flow for Microsoft is: Enter email address → enter password → approve notification on phone.
This step will remove the middle requirement of entering your password. This is beneficial because typing your password fewer times results in less chances for your password to be intercepted, either by complicated methods like keyloggers and attacker-in-the-middle techniques, or as crude as someone watching over your shoulder.
Open the Authenticator app on your phone
Tap on the St Vincent’s Institute entry for your email address
Select the Set up phone sign-in option
Click Continue
Enter your Microsoft password and click Sign In
Approve the prompt to “register” the device
This just assigns your device a unique ID and links this to your Microsoft account, so the sign-in requests can be sent to this specific device.
Now that your phone has been registered, you can use it to sign in instead of your password
Open a private or incognito window in a web browser
Go to www.office.com and click Sign In
Enter your SVI email address
When prompted for your password, click the blue text Use an app instead
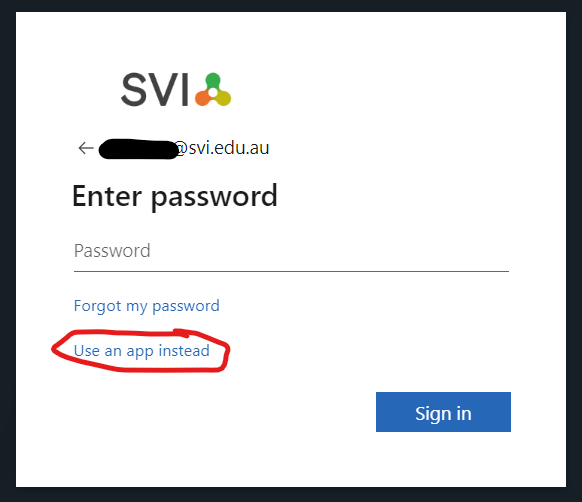
This will show a 2 digit number and send an authentication request to your Authenticator app
Authorise the sign-in
Your account will now automatically use a passwordless login (where possible), and will immediately send an Authenticator request after entering your SVI email address at a login window
...
If you have any issues please raise a IT ticket for further help.